Courier
You can use the Courier user interface (UI) to view and create Courier Jobs and Global Exceptions within Chef 360 Platform UI. You can create jobs with multiple actions.
Courier Jobs
You can see all existing jobs in the Courier Jobs page. You can click the Refresh icon to update the list.
The All Jobs table shows:
- Courier Job Name: The name of the Courier Job.
- Job ID: A unique Job ID. For example:
ae31d082-94cc-4158-8609-b2b477ac89d5. - Job Created On: The date the job was created.
- Status: Whether the job is active or inactive.
- Last Job Instance: The date when the job was last run.
- Last Job Instance Status: The result of the previous job run (whether it was a Success or Failure).
- Job Schedule: Schedule of the job.
- All Node Distribution Group: A View button that shows the Node Collection, Batch size, Batch Type, Timeout, and Success Criteria.
Create a Courier job
To create a new Courier job, select Create Courier Job. This brings you to a wizard to create your courier job. Refer to the steps in the following sections for details on each step in the wizard.
Node Selection
You can add nodes to a job using either Node Collections or you can add nodes manually.
Refer to the relevant sub-section depending on which option you use.
Add nodes using Node Collections
To add nodes using the Node Collections tab, follow these steps:
Select either Node Filters or Node Lists from the drop-down list to view the existing node filters or node lists.
Select the node filter or node lists to add.
Fill out the mandatory sections (Batch Size, Unit, Batch Type, Timeout Value (in seconds) and Success Criteria (in percentage)) for the node and select Next.
Select Next to continue to the Job Schedule step in the wizard.
Add nodes manually
To add nodes manually, follow these steps:
You can add nodes manually using either a comma-separated list of Node IDs or you can create an ad-hoc node filter in JSON format.
- Create an ad-hoc node filter
An ad-hoc node filter is a JSON string that filters nodes using the following optional node properties:
- attributes
- skills
- override settings
- enrollment level
- health status
Use the following to create an ad-hoc filter. See the example below.
constraints- The JSON object that defines the full set of filter constraints.
Type: object
attributes- An array of node attributes.
Type: array of objects
name- The name of the attribute. The node agents collect data on the following authoritative attribute names:
kernel_name,architecture,hostname,os_name,os_version,kernel_version,primary_ip,netmask, andtime_zone.Type: string
namespace- The attribute’s namespace.
Type: array of strings
operator- The operator used to evaluate the attribute and value.
Type: string (filter-operator-compare)
Valid values:
=,!=,CONTAINS,MATCHES=: Checks if two values are identical.!=: Tests if two values are different.CONTAINS: Verifies if one value is within another.MATCHES: Searches for patterns using regular expressions.
value- A list of values to match an attribute value. The operator will be applied to each value individually. If the array contains more than one value, it is equivalent to using the
INoperator.Type: array of strings
skills- An array of installed skills.
Type: array of objects
name- The skill name.
Type: string
type- The skill type.
Valid values:
Canister,NativeCanister: Skill installed as a Chef Habitat package.Native: Represents a skill installed natively.
Type: enum
version- A list of values to match on a skill version. Each value takes the form
[symbol] [version].Valid symbols include:
=,!=,<,>,<=, and>=.The version should be any valid SemVer (Semantic Versioning). Multiple version constraints can be applied to the skill.
Type: array of strings
overrideSettings- A node’s override settings.
Type: object
name- An array of override settings group names.
Type: array of strings
operator- The operator used to evaluate the attribute and value.
Type: string (filter-operator-compare)
Valid values:
=,!=,CONTAINS,MATCHES=: Checks if two values are identical.!=: Tests if two values are different.CONTAINS: Verifies if one value is within another.MATCHES: Searches for patterns using regular expressions.
skillSettings- An array of skill settings.
Type: array of objects
skillName- The skill name.
Type: string
settingName- The name of the setting key.
Type: string
operator- The operator used to evaluate the attribute and value.
Type: string (filter-operator-compare)
Valid values:
=,!=,CONTAINS,MATCHES=: Checks if two values are identical.!=: Tests if two values are different.CONTAINS: Verifies if one value is within another.MATCHES: Searches for patterns using regular expressions.
value- A list of values to match an matched setting value with the setting name.
Type: array of strings
enrollmentLevel- A node’s enrollment level.
Type: object
operator- The operator to match the value with.
Type: string (filter-operator-compare)
Valid values:
=,!==: Checks if two values are identical.!=: Tests if two values are different.
value- A list of values to match the health status. The operator will be applied to each value individually. If the array contains more than one value, it is equivalent to using the
INoperator.Valid values:
admitted,inducted,registered, andenrolled.Type: array of strings
healthStatus- A node’s health status.
type: object
operator- The operator to match the value with.
Type: string (filter-operator-compare)
Valid values:
=,!==: Checks if two values are identical.!=: Tests if two values are different.
value- A list of values to match the health status. The operator will be applied to each value individually. If the array contains more than one value, it is equivalent to using the
INoperator.Valid values:
online,waiting,ready,reachable,offline, andunknown.Type: array of strings
Ad-hoc filter example
The following example ad-hoc node filter returns nodes running on the Windows kernel with the Chef Infra Client skill installed:
{
    "constraints": {
        "attributes": [
            {
                "name": "kernel_name",
                "operator": "=",
                "value": [
                    "Windows"
                ]
            }
        ],
        "skills": [
            {
                "name": "chef-infra-client"
            }
        ]
    }
}
- Create an ad-hoc node filter
Enter the node filter in the text box and select Add To Job. You can now view the node details in the Node Collection section.
Fill out the mandatory sections (Batch Size, Unit, Batch Type, Timeout Value (in seconds) and Success Criteria (in percentage)) for the node.
Select Next to continue to the Job Schedule step in the wizard.
Job Schedule
In the Job Schedule step of the wizard, follow these steps:
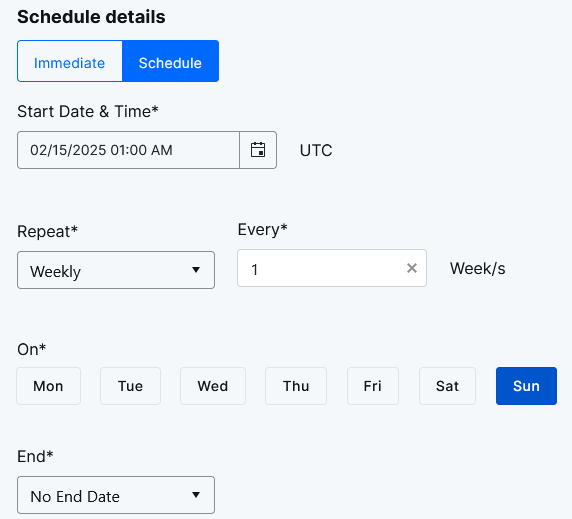
You can either select Immediate (the target nodes start executing this job once their current jobs are complete) or you can Schedule the job to be started on a particular date and time. If you are scheduling the job, you can specify if you want it to Repeat (and how often).
You can add Exceptions to specify times during which the job shouldn’t run. You can also schedule these exceptions to Repeat.
Note
Global exceptions apply to any job that’s created within the organization - there is no need to explicitly apply global exceptions when you create a job.Select Next to continue to the Job Run step in the wizard.
Job Run
In the Job Run section of the wizard, follow these steps:
Enter the details of the Job Run (the actions you want to execute) in the fields:
Enter a unique name as the Step Name.
Select a Skill.
Select the Min Version and Max Version for the Skill.
Specify one or more commands appropriate to the specified interpreter in the Command field. For example, a list of commands to be run by the OS command skill or the cookbook to be run by Chef Infra Client.
Example:
{ "exec": "machine_reboot", "args": { "time": 90 } }Select the Failure Action and the number of retry attempts:
- Retry Then Fail: If the step fails after the number of retries are exhausted, fail this step and abort the job run.
- Retry Then Ignore: If the step fails after the number of retries are exhausted, update this step as having failed and continue to the next step.
Select the Retry Strategy and the base delay (in seconds) between each retry/attempt.
Select Add Limits to specify the limits that a step can’t exceed. Execution of the step is stopped when the limit is crossed:
Cores: The number of cores to make available to the interpreter and any child processes for this step. The default is 0 for ‘all’.
CPU: The amount of CPU (0.0–1.0) that the interpreter and children can use in this step. The default is 1.0, which is unlimited.
CPU Time (Seconds): The time limit in seconds. If the execution time exceeds this, the action is considered as failed, the agent cleanly ends the action, and retry rules apply. A value of 0 means there is no time limit.
Select Add Conditions to specify a list of conditions that must all evaluate to true. If the condition evaluates to false, the step is skipped.
Conditions: Enter a name for the condition.
Operator: The operator to apply when making the comparison. Note that ranges can be accommodated with multiple conditions, such as “less than or equal to” (lte) and “greater than or equal to” (gte) 0. Possible values:
- eq
- gt
- gte
- lt
- lte
- matches
- startsWith
- endsWith
- contains
Negate: Whether to negate the comparison operator. For example, when true, eq is evaluated as ’not equal to'.
Value: The literal value to compare against.
Select Save Condition to save a condition. You can add multiple conditions, if needed.
Select Add Output Rule to add an output rule. This describes how to process the step’s output to extract the required output field value. The key and extracted value can be provided to the next step as an input:
Output Rule: Enter a name for the output rule.
Source Type: Select the type of source the output field value is extracted from. Combined with Source, this is used to assign the output field value. Possible values:
- artifact: the output field value is extracted from an artifact.
- exitCode: the output field value is the exit code of the step.
- file: the output field value is extracted from a file.
- output: the output field value is extracted from the standard output or standard error streams of the step.
Source: Where the output field value comes from. This is dependent on the Source Type:
- If the Source Type is artifact, then Source must be a path, for example
source="/tmp/path/file.log". - If Source Type is exitCode, then the Source property isn’t used.
- If Source Type is file, then Source must be a path, such as
source="/tmp/path/file.txt". - If Source Type is output, then Source must be the output name, either
stdoutorstderr.
- If the Source Type is artifact, then Source must be a path, for example
Sensitivity: When enabled, the value of this input must be redacted before submitting to Courier as part of outputs in the payload, and before writing to any local log files.
Required: When enabled, fail this step if the client/interpreter can’t extract the field value for any reason.
Matching Method: The method to extract the output:
regEx: a regular expression to run against Source to extract the field value.
jsonPath: parse source as JSON and extract the value using the path specified in expression.
content: include the full content of Source based on the Source Type.
- If Source Type is artifact, then Matching Method yields the full content of the artifact.
- If Source Type is exitCode, then Matching Method is treated as content and yields the exit code itself.
- If Source Type is file, then Matching Method yields the full content of the file.
- If Source Type is output, then Matching Method yields the full output (stdout or stderr based on Source).
Note that content is intended for small payloads (measured in tens of bytes or less) since it’s used for comparison purposes in subsequent steps.
Expression: The expression to apply to Source using the Matching Method to extract the value. If extractMethod is set to:
- regEx, define a regular expression to extract the value.
- jsonPath, define a JSON path to the value.
- content, then the full content of source is based on the sourceType:
- If Source Type is artifact, then content includes the full content of the artifact.
- If Source Type is exitCode, then content is the exit code value of the step.
- If Source Type is file, then content is the full content of the file
- If Source Type is output, then content includes everything emitted from the standard output or standard error output stream.
Select Save Output Rule. You can add multiple output rules, if needed.
Select Add Input Variable to optionally specify a name -> string value object that provides pre-set inputs and their values to this action/step. These are pre-defined inputs to the action, and are independent of prior steps. The agent prioritizes inputs from previous steps over those provided in the definition. Note that sensitive inputs aren’t redacted when sent from the Courier Server to the agent.
Input variables are optional and can be omitted if no additional inputs are necessary. You can add multiple input variables, if needed.
Select Add Expected Input Variable to optionally add an object mapping of expected input field names to their definitions. This field is optional and can be omitted if there are no expected inputs.
You can use expected inputs to make outputs from any step be available for usage in any subsequent step. For example:
- Step one has the output variable
ABC. - Step two has the output variable
DEF. - Step three can include
ABCin the step by adding it to the expected inputs. - Step four can include
ABCandDEFin the step by adding them to the expected inputs.
The value stored in the output variables can be updated by any step and this will be reflected in subsequent steps. In the above example, if step three sets a new value in ABC as output variable, then step four will get this new value for ABC and not the original value from step one.
Sensitivity: When enabled, the value of this input must be redacted before submitting to Courier as part of outputs in the payload, and before writing to any local log files.
Required: When enabled, fail this step if the client/interpreter can’t extract the field value for any reason.
You can add multiple expected input variables, if needed.
- Step one has the output variable
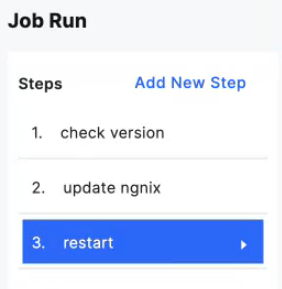
You can add or delete steps, as required.
After specifying the details of the Job Run, select Next.
Enter the Job Name and the Description.
On the summary page, review the node selection and the job run. Then, select Save Job.
View a Courier job
To view a Courier job, select the job. The page shows the job details, including the Job Summary, Description, Node Groups, and Actions. Select View on the Jobs table to view the full job summary.
The Job Details page also shows All Job Instances. The All Job Instances table shows the Job Instance, Date, Status, Start Time, Run Time, No of Nodes, and Status Break Down.
View a job instance
To view a Job instance, select the instance. The page shows all the Job runs of the instance. The table shows the Node ID, Run Status, Platform and Version, Run Time, and Last Executed Step. Select a job run to view the full job run summary. Select Download to download the log file of the running instances.
Create a duplicate job
You can create a new job from an existing job template. To create a duplicate job, follow these steps:
Select a job from the Courier Jobs table.
Select Duplicate Job.
Fill out the mandatory Job Name and Description fields.
To edit the Node Selection list, select Edit Node Collection (pencil icon).
- Modify the node collection and select Next.
To edit the Job Run list, select Edit Job Run (pencil icon).
- Modify the job run wizard and select Next.
Select Save Job.
Terminate a job
To terminate a job, follow these steps on the job’s page:
Select Terminate Job on the job you want to terminate.
In the pop-up window, select Terminate to remove the Courier job.
When the job is terminated, the job table gets updated.
Global Exceptions
Global exceptions can be created for the entire organization. Global exceptions apply to any job that’s created within the organization - there is no need to explicitly apply global exceptions when you create a job.
You can access the Global Exceptions page by selecting Global Exceptions in the left navigation.
The Global Exceptions page lists the details for any existing global exceptions.
To create a new global exception, follow these steps:
- Select Create New Exception.
- Select the relevant date and time in the From and To fields.
- Specify if you want the global exception to repeat. Depending on what option you select in the Repeat drop-down list, there may be further fields to populate.
- Select Save to save the global exception.